精通
英语
和
开源
,
擅长
开发
与
培训
,
胸怀四海
第一信赖
精通
英语
和
开源
,
擅长
开发
与
培训
,
胸怀四海
第一信赖
锐英源精品开源心得,转载请注明:“锐英源www.wisestudy.cn,孙老师作品,电话13803810136。”需要全文内容也请联系孙老师。中文译文
The ASP.NET MVC Framework allows building a Web application as a composition of three roles: Model, View, and Controller. The View role can be implemented in several ways. The popular view engines used in the ASP.NET MVC 3 Framework are the Razor View Engine and the Web Forms (ASPX) view engine. Other than that a View can be implemented by accessing Controller methods using jQuery. This article illustrates all these ways of implementation of Views in an MVC application.
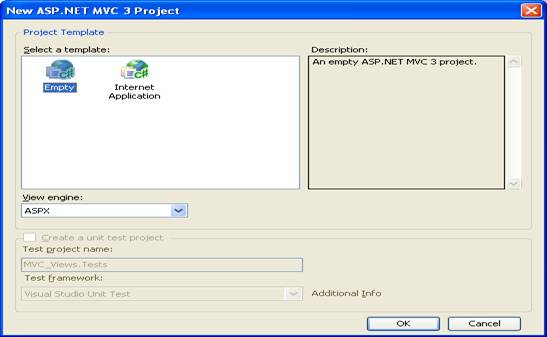
First let’s create an MVC application and develop the Model and Controller parts. Create an empty MVC3 application. Set the “View engine” as ASPX.
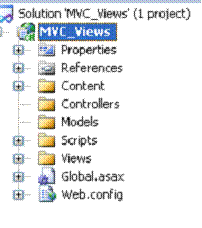
A project with the following folder structure will be created:
In order to create the Model, add the following class under the “Model” folder:
Product.cs
                  public class  Product
                  {
                  public string ProductID { get;  set; }
                  public string ProductName { get;  set; }
                  public int Quantity { get; set; }
                  public decimal Price { get; set; }
                  }
In order to create a Controller method, right click on the “Controller” folder, then select Add - >Controller. Name the Controller as ProductController.

public class ProductController : Controller
                  {
                   //
                  // GET: /Product/

                  public ActionResult Index()
                  {
                      return View();
                  }
                  }
The method returns an ActionResult. Every method in a controller class returns an ActionResult by default. An ActionResult is a return type of a controller method, also called an action method. ActionResult encapsulates the result of an action method and is used to perform a framework level operation on behalf of the action method.
Let’s modify the action method in order to return a list of Products using the Product model:
                  public ActionResult ProductList()
                  {
                  List<Product> productLst = new List<Product>{
                  new  Product{ProductID="P01",ProductName="Pen",Quantity=10,Price=12},
                  new  Product{ProductID="P02",ProductName="Copy",Quantity=12,Price=20},
                  new  Product{ProductID="P03",ProductName="Pencil",Quantity=15,Price=22},
                  new Product{ProductID="P04",ProductName="Eraser",Quantity=20,Price=27}
                  };
                  return  View();
} Once we are done with the Controller implementation, we are ready for routing the result to some view interface. Before that we need to understand the routing construct of the MVC Framework.
Action methods and the routing system work together in every MVC application. MVC does this by using a set of conventions, defined as routing patterns, in the global.asax.cs file. These patterns connect HTTP requests with controllers and action methods. As an HTTP Request enters the routing system, it determines which controller should serve data to which view (if any). global.asax.cs defines the default routing pattern, {controller}/{action}/{id}, as follows:
                  routes.MapRoute(
                  "Default", // Route name
                "{controller}/{action}/{id}", // URL with parameters
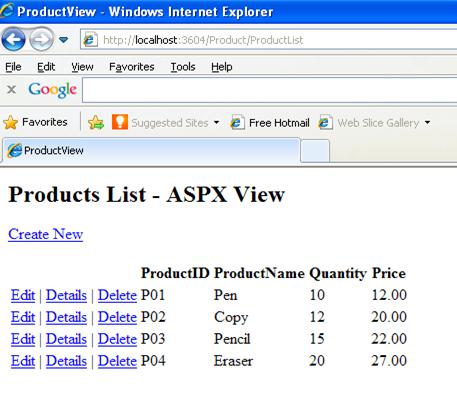
In our example, the controller name is “Product” and the action name is “ProductList”. Our controller or action method doesn’t have any parameters. So the URL for routing the result should be “Product/ProductList”.
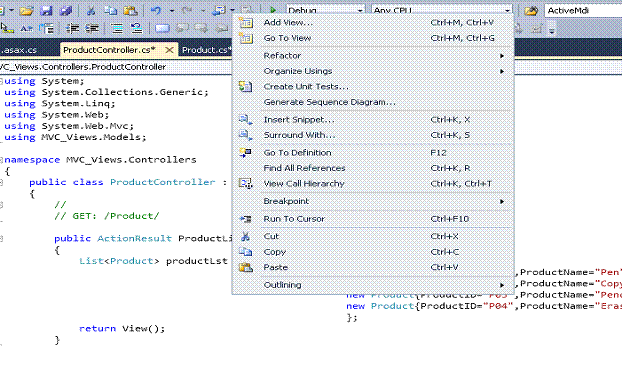
As we are done with the Model and Controller implementation, now it’s time to implement the View. Build the project. Right click in the Controller method and select “Add View”:
Let the View name be “ProductView”. Check “Create a strongly-typed view”. Select the model as Product from the View data class dropdown. Don’t forget to build the project before adding the View. Otherwise the View data classes would not be populated. Select “View Engine” as ASPX(C#). Select “View Content” as “List”.
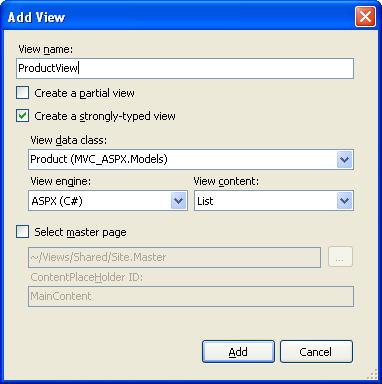
Through this screen, the ASP.NET MVC Framework helps us to implement the classic MVC design pattern in our application. We are passing the model as the “View data class” for the relevant view. Besides, we are getting the scope to selecting a “View Engine” in order to render the result returned by the Controller method. In addition to that we can mention the representation structure for the View (List, Detail, etc.) in the “View content” section.
Click “Add” in order to add the View.
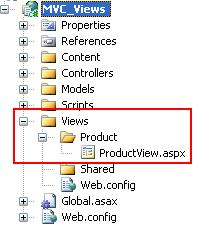
A new folder will be created with the controller name (Product), and the View file (“ProductView.aspx”) will be added in the same.
Modify the controller method in order to serve data to the newly created View “ProductView.aspx”.
                  public ActionResult ProductList()
                  {
                  List<Product> productLst = new List<Product>{
                  new  Product{ProductID="P01",ProductName="Pen",Quantity=10,Price=12},
                  new  Product{ProductID="P02",ProductName="Copy",Quantity=12,Price=20},
                  new  Product{ProductID="P03",ProductName="Pencil",Quantity=15,Price=22},
                  new  Product{ProductID="P04",ProductName="Eraser",Quantity=20,Price=27}
                  };
      return  View("ProductView", productLst);
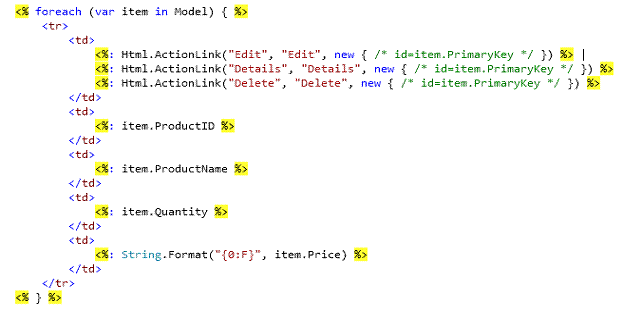
}Open the View file “ProductView.aspx”. As we have given the responsibility for rendering View to the ASPX engine, the layout has been developed using ASP.NET’s existing .ASPX markup syntax, using <%= %> blocks:
Now that we are done with the View implementation, it’s time to develop an anchor page and access the View through its routing logic. Create an “aspx” page named “default.aspx” under root and access the View through it. This page needs to be handled in a different way than normal ASPX pages. In order to achieve MVC Framework behavior, the page is required to be handled by a special HttpHandler MvcHttpHandler. Add the following code in the load event of the page:
                  public partial class _Default : Page
                  {
                  public void Page_Load(object sender, System.EventArgs e)
                  {
                  	HttpContext.Current.RewritePath(Request.ApplicationPath);
                  	IHttpHandler httpHandler = new MvcHttpHandler();
                  	httpHandler.ProcessRequest(HttpContext.Current);
                  }
                  }
Set “default.aspx” as the startup page and run the application.

Click the link in order to view the product list rendered by the ASPX View engine.