
精通
英语
和
开源
,
擅长
开发
与
培训
,
胸怀四海
第一信赖
精通
英语
和
开源
,
擅长
开发
与
培训
,
胸怀四海
第一信赖
锐英源精品开源心得,转载请注明:“锐英源www.wisestudy.cn,孙老师作品,电话13803810136。”需要全文内容也请联系孙老师。
在写WebAPI项目里研究过路由,它被ASP.NET框架封装的深,不太好理解,也不太好定制,本文提供了一个定制的方法,希望对大家有用。
This article describes content based web service routing using WSE 3.0. We can use webservice routing for load balancing or to hide internal web service from external world.
本文介绍使用WSE 3.0的基于内容的Web服务路由。我们可以使用Web服务路由进行负载平衡,或者从外部世界隐藏内部Web服务。
A background knowledge of ASP.NET 2.0, C#, WebService & WSE 3.0 is required.
需要具备ASP.NET 2.0,C#,WebService和WSE 3.0的背景知识。
In this sample application, I have three webservices:
and client web application.
和客户端Web应用程序。
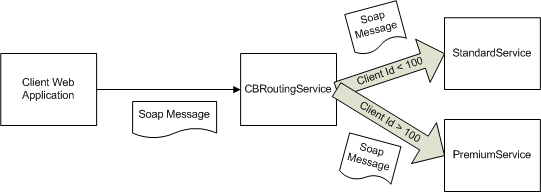
As per the above figure, client web application will consume CBRoutingService. SoapHeader will have user id stored in it. CBRoutingService will route the request to the StandardService or PremiumService based on the user id. If user id is less than 100, then it will route the request to the StandardService otherwise it will route it to PremiumService. So this is simple routing application which we will build.
Let’s do the following steps in VS 2005:
根据上图,客户端Web应用程序将使用CBRoutingService。SoapHeader 将存储用户ID。CBRoutingService将基于用户ID把请求路由到StandardService 或PremiumService 。如果用户ID小于100,那么它会将请求路由到StandardService 否则将其路由到PremiumService。所以这是我们将构建的简单路由应用程序。
让我们在VS 2005中执行以下步骤:
To create the StandardService as ASP.NET Web Service. Go to File -> New -> Web Site -> ASP.NET Web Service. Give the location as http://localhost/StandardService. Remove default Service.asmx and Service.cs files and add new web service StandardService.asmx. We will add new web method called GetServiceString in StandardService.cs as below:
创建ASP.NET Web服务命名为StandardService 。用菜单文件 - >新建 - >网站 - > ASP.NET Web服务。将位置指定为http:// localhost / StandardService。删除默认的Service.asmx和Service.cs文件,并添加新的Web服务StandardService.asmx。我们将在StandardService.cs添加GetServiceString 新Web方法,如下所示:
We also have to add AuthHeader class in StandardService.cs for passing user id in the SoapHeader and write SoapHeader attribute above GetServiceString web method. 我们还必须在StandardService.cs中添加类AuthHeader ,以便传递在SoapHeader里的用户id,且写入 SoapHeader属性,这个属性从上面 GetServiceString里获取 。
Create PremiumService in the same way, just give the location as http://localhost/PremiumService and web service name as PremiumService.asmx. We also need to change return string in GetServiceString web method of PremiumService.
PremiumService 以相同的方式创建,只需将位置指定为http:// localhost / PremiumService,将Web服务名称指定为PremiumService.asmx。我们还需要改变GetServiceString web方法的返回类型为string 。
Now we will create routing service by same way with http://localhost/CBRouter as location. Add new web service and give name as CBRoutingService.asmx.
Keep the default setting as it is for now. We will change it latter.
Now we need to have handler which will intercept the request to CBRoutingService. So we need to add class library project for that by right click on solution -> Add -> New Project and select Class Library template. Now add new class called CBRoutingHandler.
Add the following references to your project:
We have to derived Microsoft.Web.Services3.Messaging.SoapHttpRouter in CBRoutingHandler class and implement ProcessRequestMessage method to intercept the web service request.
我们必须在CBRoutingHandler类中派生出Microsoft.Web.Services3.Messaging.SoapHttpRouter 并实现ProcessRequestMessage方法来拦截Web服务请求。
using System;
using System.Configuration;
using System.Xml;
using Microsoft.Web.Services3;
using Microsoft.Web.Services3.Messaging;
///<summary>
/// Summary description for CBRoutingHandler
///</summary>
namespace CBRouter
{
public class CBRoutingHandler : Microsoft.Web.Services3.Messaging.SoapHttpRouter
{
static readonly string PremiumNamespaceUri =
"http://schemas.contoso.com/cbr";
static readonly string PremiumHeaderName = "authheader";
Uri premiumServiceUri;
Uri standardServiceUri;
public CBRoutingHandler()
{
string premiumServiceUrl =
"http://localhost/PremiumService/PremiumService.asmx";
string standardServiceUrl =
"http://localhost/StandardService/StandardService.asmx";
if (premiumServiceUrl == null || premiumServiceUrl.Length == 0)
{
throw new ConfigurationException("There was no \"Premium Web Service\"
entry in the <appsettings /> section of the router's configuration file.");
}
this.premiumServiceUri = new Uri(premiumServiceUrl);
this.standardServiceUri = new Uri(standardServiceUrl);
}
protected override Uri ProcessRequestMessage(SoapEnvelope message)
{
// Look for user id.
if (!string.IsNullOrEmpty(message.Header.InnerText))
{
if (Convert.ToInt32(message.Header.InnerText) > 100)
{
return premiumServiceUri;
}
}
return standardServiceUri;
}
}
}
Add CBRoutingHandler project reference in CBRouter web service.
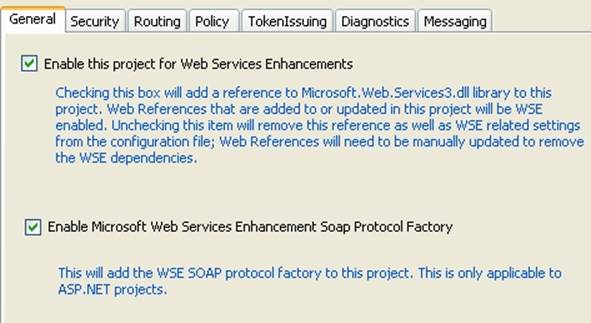
Now you have to enable WSE based routing in CBRoutingService. To do this, follow the below steps:
在CBRouter Web服务中 添加CBRoutingHandler项目引用。
现在,您必须启用基于WSE的路由CBRoutingService。为此,请按照以下步骤操作:
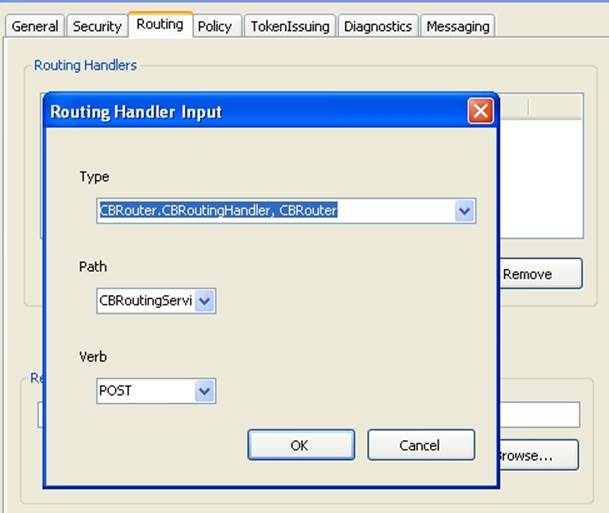
Now click on Routing tab. Click Add to add routing handlers and give CBRoutingHandler information as below, type = “CBRouter.CBRoutingHandler, CBRouter” Path=” CBRoutingService.asmx” and Verb=”POST”.
现在单击Routing选项卡。单击添加以添加路由处理程序并向CBRoutingHandler完善 如下信息,键入=“ CBRouter.CBRoutingHandler,CBRouter” Path =“ CBRoutingService.asmx ”和Verb =“ POST”。
You can see the changes in web.config file. It has added httphandlers in web.config.
Now we have to give WSDL to the client so that they can generate the proxy and consume it.
Save WSDL of StandardService or PremiumService as .wsdl file. Open this file in editor and change the URL to CBRoutingService URL as below:
您可以在web.config文件中看到更改。它已添加httphandlers 到web.config中。
现在我们必须将WSDL提供给客户端,以便它们可以生成代理并使用它。
保存的WSDL StandardService 或 PremiumService 作为的.wsdl文件。在编辑器中打开此文件,并将URL更改为CBRoutingService URL,如下所示:
<wsdl:service name="StandardService">
<wsdl:port name="StandardServiceSoap" binding="tns:StandardServiceSoap">
<soap:address location="http://localhost/CBRouter/CBRoutingService.asmx" />
</wsdl:port>
<wsdl:port name="StandardServiceSoap12" binding="tns:StandardServiceSoap12">
<soap12:address location="http://localhost/CBRouter/CBRoutingService.asmx" />
</wsdl:port>
</wsdl:service>
So now we have .wsdl file, but it points to CBRouter. 所以现在我们有.wsdl文件,但它指向CBRouter。
Now create client web site. Here, do not add web reference for StandardService instead create proxy class with wsdl.exe using modified WSDL file.
Open .net command prompt and give following command:
现在创建客户端网站。在这里,不要引用StandardService,而是用修改后的WSDL文件创建代理类。
打开.net命令提示符并提供以下命令:
Now add this StandardServiceProxy.cs to your website project.
Add textbox and button on the page. On button click, we will pass the textbox value to web service call.
现在将此StandardServiceProxy.cs添加到您的网站项目中。
在页面上添加文本框和按钮。在按钮单击时,我们将文本框值传递给Web服务调用。
standardSer.AuthHeaderValue = auth;
string str = standardSer.GetServiceString();
lbl.Text = str;
}
catch (Exception ex)
{
lbl.Text = ex.Message;
}
}
Now run the website and enter any user id. You will get the response based on user id: 现在运行网站并输入任何用户ID。您将根据用户ID获得响应: